1890's Capelet Mishaps
Dear Venturers,
Good morning! A few weeks ago a completed an 1890’s-1900’s ish capelet, but I’m just now writing about it…
I have to say that I’m not very pleased with it at all and it looks horrible, but, hopefully you’ll be able to make something decent since I obviously cannot.
Here’s some pictures I used as guides:


I really like the ruffle along the bottom in the first and second one, so I might add that on later. I also want to add a ruffle around the neck as well. I like the collar look better, but I don’t trust myself to make a nice looking collar 🤣
The Fabrics:
I used a pretty heavy, off white fabric.
I also wanted to line it with some lovely olive green silk that I’d been saving for years. It would have been BEAUTIFUL, and a stunning statement underneath the white, but, it turns out that I did not have enough of it. Sigh…
So, I used a yellow-y silk (I despise the color, but the feel of it is so soft that I couldn’t get rid of it!). It’s almost the same color as the outside fabric, so it’s not really striking to look at, but I figured a 19th century farm woman out on the Texas frontier (I made it for a pioneer type dress for a place that I volunteer at) would have made do with what she had.
So, I went to cut out the pieces. Apparently I cut a giant hole out of the side of the yellow silk at some point. So I had to work around that. It’s all very complicated, and pairing that with my lack of proper sewing skills, I made an absolute mess! What fun!
The Sewing Part:
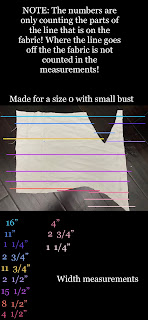
The first step is to cut out a giant circle.
 |
| Notice the marks I made to cut out the circle using the measuring tape |
Then fold it in half and cut out a tiny circle. Then unfold it to create the opening.
 |
| I used a toilet paper roll to make an even circle |

This is part of where I messed up, because I made the joke WAY to big! It doesn’t have to be very big! You hardly even need a hole in the first place. The point is to create a bit of allowance for your neck to sit in.
Anyways,
You then need to cut out the exact same shape from your lining, and then fold the top fabric over the lining to hem it all together. Then you can add your trims and ties and wanted.

Here’s it all done:
 |
| The inside- notice the giant hole |
 |
| It does drape pretty nicely |
 |
| The outside |
Do you see how the neck is WAY to big (as shown on the mannequin) ?
Instead of being tight and high up on the neck, it’s drooping around in the front.
In conclusion, I hate the whole thing, and hope that it will look better with trim.
Perhaps yours will be a success!


Comments
Post a Comment
How does this relate to you? What did you think?