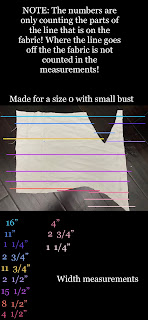
Dear Venturers, I have one literal day to complete a corset. Sounds crazy, right?? I was looking for how to make one. There’s lots of videos and stuff, but no patterns! Unless, of course, you buy one. So here is how to make one yourself! (for free! ;)) NOTE: this is for one half of a corset! Not for both sides! 1. Choose your fabric. I would recommend a twin sheet for this one. Maybe 2-4 king-sized pillowcases. I used a white cotton sateen which I will also double-layer. 2. Cut out the main piece. These are the measurements: 3. Next you’ll need a triangular piece to fit in the V-shaped hole for the bust. The larger the V and triangle, the more bust you have. Here’s mine: 4. Add in the hip piece. These are the measurements. This part was very tricky for me! 5. Cut a few slits in the sides. Do this by cutting a straight line wherever you have extra fabric hanging, and then curve in each side of the slit by just a little bit. Then sew the slit together again....
Dear Venturers, Greetings! Today I stained some of the floors in my dollhouse, and I made a video to share. Here it is! Venturing in the Prior is on Pinterest!
Dear Venturers, Good evening! Today I would like to talk about some 18th Century undergarments, why you don't need patterns for most of them, and instructions for making them. Stays: Please, please, please buy a pattern!!! Shifts: Shifts are surprisingly easy to make. Here's how I made mine... fold your white linen in half and cut out a rectangle (long enough to reach from your shoulders to below your knee) with the top end (one of the short ends) on the fold. cut a semi-circle into the center of the folded edge (this will be your neck hole) cut an elongated triangle and two more rectangles (sleeve length) from the linen unfold the main body of the shift and sew in the pieces as shown fold it over again and sew the remaining seams Petticoats: Again, it's not to bad. Here's how I did mine... You'll need to start with a very long rectangle of fabric that is as wide as your waist to floor measurement (don't worry about seam allowance because you'll want it...


Comments
Post a Comment
How does this relate to you? What did you think?